转载:http://blog.csdn.net/sbsujjbcy/article/details/50523623
Okio库是一个由square公司开发的,它补充了java.io和java.nio的不足,以便可以更加方便。高速的訪问、存储和处理你的数据。
而OkHttp的底层也使用该库作为支持。而在开发中,使用该库可以大大给你带来方便。
眼下,Okio的最新版本号是1.6.0,gradle的引用例如以下
compile 'com.squareup.okio:okio:1.6.0' - 1
- 2
- 3
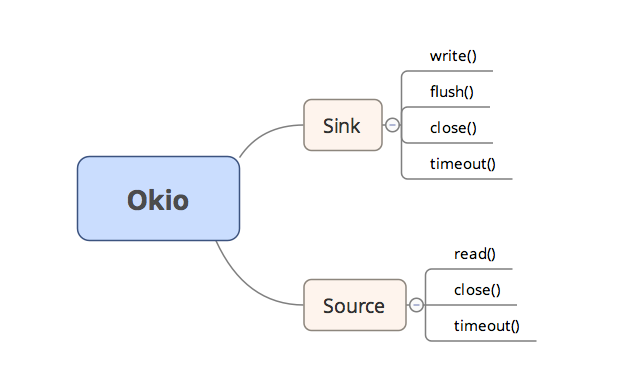
Okio中有两个关键的接口,Sink和Source,这两个接口都继承了Closeable接口;而Sink能够简单的看做OutputStream,Source能够简单的看做InputStream。
而这两个接口都是支持读写超时设置的。
结构图例如以下
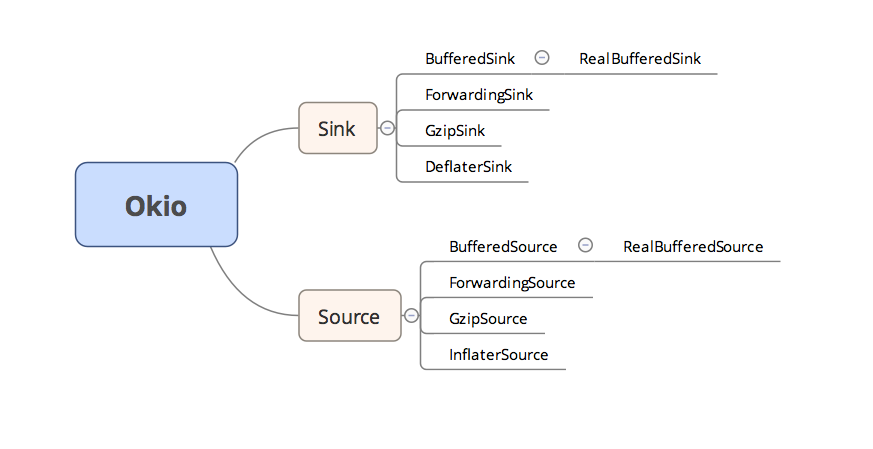
它们各自有一个支持缓冲区的子类接口,BufferedSink和BufferedSource。而BufferedSink有一个实现类RealBufferedSink,BufferedSource有一个实现类RealBufferedSource。此外。Sink和Source它门还各自有一个支持gzip压缩的实现类GzipSink和GzipSource;一个具有托付功能的抽象类ForwardingSink和ForwardingSource;另一个实现类便是InflaterSource和DeflaterSink,这两个类主要用于压缩。为GzipSink和GzipSource服务;总体的结构图例如以下
BufferedSink中定义了一系列写入缓存区的方法,比方write方法写byte数组,writeUtf8写字符串,另一些列的writeByte,writeString。writeShort,writeInt。writeLong。writeDecimalLong等等方法;
BufferedSource定义的方法和BufferedSink极为相似。仅仅只是一个是写一个是读,基本上都是一一相应的,如readUtf8。readByte,readString,readShort。readInt等等等等。这两个接口中的方法有兴趣的点源代码进去看就能够了。
而这两个支持缓冲区的接口的实现类RealBufferedSink和RealBufferedSource都是通过包装一个Sink+Buffer或者Source+Buffer来进行实现的。
例如以下图所看到的

拿RealBufferedSink来举例,实际调用的write的一系列方法。都是直接的对成员变量buffer进行的操作,当写入buffer成功后,最后会调用一个方法将buffer中的内容写入到sink中去,我们随便拿一个方法看一下
public BufferedSink writeLong(long v) throws IOException { if(this.closed) { throw new IllegalStateException("closed"); } else { this.buffer.writeLong(v); return this.emitCompleteSegments(); } } - 1
- 2
- 3
- 4
- 5
- 6
- 7
- 8
- 9
- 10
- 11
- 12
- 13
- 14
- 15
- 16
- 17
能够看到,首先会推断closed成员变量是否是标记着关闭。假设已经关闭了则扔出一个异常。否则将内容写入到buffer。写入完毕后调用了一个emitCompleteSegments的方法。该方法中做了什么呢,没错。就是将buffer中的内容写入到sink成员变量中去。然后将自身返回。
public BufferedSink emitCompleteSegments() throws IOException { if(this.closed) { throw new IllegalStateException("closed"); } else { long byteCount = this.buffer.completeSegmentByteCount(); if(byteCount > 0L) { this.sink.write(this.buffer, byteCount); } return this; } } - 1
- 2
- 3
- 4
- 5
- 6
- 7
- 8
- 9
- 10
- 11
- 12
- 13
- 14
- 15
- 16
- 17
- 18
- 19
- 20
- 21
- 22
- 23
这两个实现类的内部的全部方法都是类似的。这里不一一展开。
而这一切的背后都是一个叫做Buffer的类在支持着缓冲区,Buffer是BufferedSink和BufferedSource的实现类,因此它既能够用来读数据,也能够用来写数据,其内部使用了一个Segment和SegmentPool。维持着一个链表,其循环利用的机制和Android中Message的利用机制是一模一样的。
final class SegmentPool { static final long MAX_SIZE = 65536L; static Segment next; static long byteCount; private SegmentPool() { } static Segment take() { Class var0 = SegmentPool.class; synchronized(SegmentPool.class) { if(next != null) { Segment result = next; next = result.next; result.next = null; byteCount -= 2048L; return result; } } return new Segment(); } static void recycle(Segment segment) { if(segment.next == null && segment.prev == null) { if(!segment.shared) { Class var1 = SegmentPool.class; synchronized(SegmentPool.class) { if(byteCount + 2048L <= 65536L) { byteCount += 2048L; segment.next = next; segment.pos = segment.limit = 0; next = segment; } } } } else { throw new IllegalArgumentException(); } }} - 1
- 2
- 3
- 4
- 5
- 6
- 7
- 8
- 9
- 10
- 11
- 12
- 13
- 14
- 15
- 16
- 17
- 18
- 19
- 20
- 21
- 22
- 23
- 24
- 25
- 26
- 27
- 28
- 29
- 30
- 31
- 32
- 33
- 34
- 35
- 36
- 37
- 38
- 39
- 40
- 41
- 42
- 43
- 44
- 45
- 46
- 47
- 48
- 49
- 50
- 51
- 52
- 53
- 54
- 55
- 56
- 57
- 58
- 59
- 60
- 61
- 62
- 63
- 64
- 65
- 66
- 67
- 68
- 69
- 70
- 71
- 72
- 73
- 74
- 75
- 76
- 77
- 78
- 79
- 80
- 81
- 82
- 83
内部一个成员变量next指向链表下一个元素,take方法首先推断池中是否存在可用的,存在则返回,不存在则new一个,而recycle则是将不再使用的Segment又一次扔到池中去。从而达到一个Segment池的作用。
而Okio暴露给外部使用的类便是Okio这个类。其内部有大量的静态方法,包含通过一个Source获得BufferedSource。通过一个Sink获得一个BufferedSink。这个过程非常easy,我们调用Okio的buffer方法就可以返回我们须要的,例如以下
Okio.buffer(sink)Okio.buffer(source) - 1
- 2
- 3
- 4
- 5
可是上面两个方法须要传递一个Sink或者Source。那么这个Sink和Source又是怎样获得的呢。事实上方法也在Okio这个类中。我们能够调用sink方法获得一个Sink,调用source方法获得一个Source,而数据的来源或者目的能够是一个File,一个输入或者输出流。一个Socket链接等等。例如以下
Okio.sink(new File("***"));Okio.sink(new FileOutputStream(new File("***")));Okio.sink(new Socket("***",8888));Okio.source(new File("***"));Okio.source(new FileInputStream(new File("***")));Okio.source(new Socket("****",8888)); - 1
- 2
- 3
- 4
- 5
- 6
- 7
- 8
- 9
- 10
- 11
- 12
- 13
- 14
- 15
- 16
- 17
这样你可能还只是瘾。那么让我们连起来应用一下,如今我们从本地读一个文件,读完后再往还有一个文件里写入内容。
public static void main(String[] args) { Source source = null; BufferedSource bufferedSource = null; try { File file = new File("resources/test.txt"); source = Okio.source(file); bufferedSource = Okio.buffer(source); String content = bufferedSource.readUtf8(); System.out.println(content); } catch (FileNotFoundException e) { e.printStackTrace(); } catch (IOException e) { e.printStackTrace(); } finally { closeQuietly(bufferedSource); } Sink sink = null; BufferedSink bufferedSink = null; try { File dest = new File("resources/dest.txt"); sink = Okio.sink(dest); bufferedSink = Okio.buffer(sink); bufferedSink.writeUtf8("11111111111"); } catch (FileNotFoundException e) { e.printStackTrace(); } catch (IOException e) { e.printStackTrace(); } finally { closeQuietly(bufferedSink); }}public static void closeQuietly(Closeable closeable) { if (closeable != null) { try { closeable.close(); } catch (RuntimeException rethrown) { throw rethrown; } catch (Exception ignored) { } }} - 1
- 2
- 3
- 4
- 5
- 6
- 7
- 8
- 9
- 10
- 11
- 12
- 13
- 14
- 15
- 16
- 17
- 18
- 19
- 20
- 21
- 22
- 23
- 24
- 25
- 26
- 27
- 28
- 29
- 30
- 31
- 32
- 33
- 34
- 35
- 36
- 37
- 38
- 39
- 40
- 41
- 42
- 43
- 44
- 45
- 46
- 47
- 48
- 49
- 50
- 51
- 52
- 53
- 54
- 55
- 56
- 57
- 58
- 59
- 60
- 61
- 62
- 63
- 64
- 65
- 66
- 67
- 68
- 69
- 70
- 71
- 72
- 73
- 74
- 75
- 76
- 77
- 78
- 79
- 80
- 81
- 82
- 83
- 84
- 85
- 86
- 87
- 88
- 89
- 90
- 91
也许有时候网络请求中,我们须要使用到Gzip的功能。那么。我们能够简单的使用一下gzip的功能
public static void main(String[] args) { Sink sink = null; BufferedSink bufferedSink = null; GzipSink gzipSink=null; try { File dest = new File("resources/gzip.txt"); sink = Okio.sink(dest); gzipSink=new GzipSink(sink); bufferedSink = Okio.buffer(gzipSink); bufferedSink.writeUtf8("android vs ios"); } catch (FileNotFoundException e) { e.printStackTrace(); } catch (IOException e) { e.printStackTrace(); } finally { closeQuietly(bufferedSink); } Source source = null; BufferedSource bufferedSource = null; GzipSource gzipSource=null; try { File file = new File("resources/gzip.txt"); source = Okio.source(file); gzipSource=new GzipSource(source); bufferedSource = Okio.buffer(gzipSource); String content = bufferedSource.readUtf8(); System.out.println(content); } catch (FileNotFoundException e) { e.printStackTrace(); } catch (IOException e) { e.printStackTrace(); } finally { closeQuietly(bufferedSource); }}public static void closeQuietly(Closeable closeable) { if (closeable != null) { try { closeable.close(); } catch (RuntimeException rethrown) { throw rethrown; } catch (Exception ignored) { } }} - 1
- 2
- 3
- 4
- 5
- 6
- 7
- 8
- 9
- 10
- 11
- 12
- 13
- 14
- 15
- 16
- 17
- 18
- 19
- 20
- 21
- 22
- 23
- 24
- 25
- 26
- 27
- 28
- 29
- 30
- 31
- 32
- 33
- 34
- 35
- 36
- 37
- 38
- 39
- 40
- 41
- 42
- 43
- 44
- 45
- 46
- 47
- 48
- 49
- 50
- 51
- 52
- 53
- 54
- 55
- 56
- 57
- 58
- 59
- 60
- 61
- 62
- 63
- 64
- 65
- 66
- 67
- 68
- 69
- 70
- 71
- 72
- 73
- 74
- 75
- 76
- 77
- 78
- 79
- 80
- 81
- 82
- 83
- 84
- 85
- 86
- 87
- 88
- 89
- 90
- 91
- 92
- 93
- 94
- 95
- 96
- 97
- 98
- 99
- 100
- 101
- 102
- 103
验证是否正确的方法便是查看该写入的文件是否是乱码,以及读出来是否是原来的字符串。
对照一下原来的gzip压缩与解压缩的方式。你就会发现还是简单了不少的
public class GzipUtil { /** * GZIP压缩 * * @param data * @return */ public static byte[] gzip(byte[] data) throws Exception { if (data == null || data.length == 0) { return null; } ByteArrayOutputStream out = new ByteArrayOutputStream(); GZIPOutputStream zos; BufferedInputStream bis = new BufferedInputStream(new ByteArrayInputStream(data)); byte[] buf = new byte[512]; int len; try { zos = new GZIPOutputStream(out); while ((len = bis.read(buf)) != -1) { zos.write(buf, 0, len); zos.flush(); } bis.close(); zos.close(); return out.toByteArray(); } finally { if (out != null) { try { out.close(); } catch (Exception e2) { } } } } /** * Gzip解压缩 * @param b * @return */ public static byte[] unGzip(byte[] b) { if (b == null || b.length == 0) { return null; } ByteArrayOutputStream out = new ByteArrayOutputStream(); ByteArrayInputStream in = new ByteArrayInputStream(b); try { GZIPInputStream gunzip = new GZIPInputStream(in); byte[] buffer = new byte[256]; int n; while ((n = gunzip.read(buffer)) >= 0) { out.write(buffer, 0, n); } return out.toByteArray(); } catch (IOException e) { Log.e(WDCore.getInstance().getConfiguration().getLogTag(), "uncompress error", e); } finally { try { if (out != null) { out.close(); } if (in != null) { in.close(); } } catch (Exception e2) { } } return null; }} - 1
- 2
- 3
- 4
- 5
- 6
- 7
- 8
- 9
- 10
- 11
- 12
- 13
- 14
- 15
- 16
- 17
- 18
- 19
- 20
- 21
- 22
- 23
- 24
- 25
- 26
- 27
- 28
- 29
- 30
- 31
- 32
- 33
- 34
- 35
- 36
- 37
- 38
- 39
- 40
- 41
- 42
- 43
- 44
- 45
- 46
- 47
- 48
- 49
- 50
- 51
- 52
- 53
- 54
- 55
- 56
- 57
- 58
- 59
- 60
- 61
- 62
- 63
- 64
- 65
- 66
- 67
- 68
- 69
- 70
- 71
- 72
- 73
- 74
- 75
- 76
- 77
- 78
- 79
- 80
- 81
- 82
- 83
- 84
- 85
- 86
- 87
- 88
- 89
- 90
- 91
- 92
- 93
- 94
- 95
- 96
- 97
- 98
- 99
- 100
- 101
- 102
- 103
- 104
- 105
- 106
- 107
- 108
- 109
- 110
- 111
- 112
- 113
- 114
- 115
- 116
- 117
- 118
- 119
- 120
- 121
- 122
- 123
- 124
- 125
- 126
- 127
- 128
- 129
- 130
- 131
- 132
- 133
- 134
- 135
- 136
- 137
- 138
- 139
- 140
- 141
- 142
- 143
- 144
- 145
- 146
- 147
- 148
- 149
- 150
- 151
- 152
- 153
- 154
- 155
- 156
- 157
- 158
- 159
- 160
- 161
- 162
- 163
- 164
- 165
- 166
- 167
- 168
- 169
- 170
- 171
此外另一个ByteString类,这个类能够用来做各种变化。它将byte转会为String,而这个String能够是utf8的值。也能够是base64后的值,也能够是md5的值。也能够是sha256的值,总之就是各种变化,最后取得你想要的值。
总之,在合适的地方适当使用一下Okio这个库。一定能给你开发带来诸多便利,何乐而不为呢。